
Regularly inspecting your construction equipment is always worthwhile. This can prevent future downtime and lengthen the life of your machine. In these uncertain times right now, it’s more important than ever to keep your equipment running efficiently and reliably, and your maintenance staff may have a little extra time on their hands to do inspections.
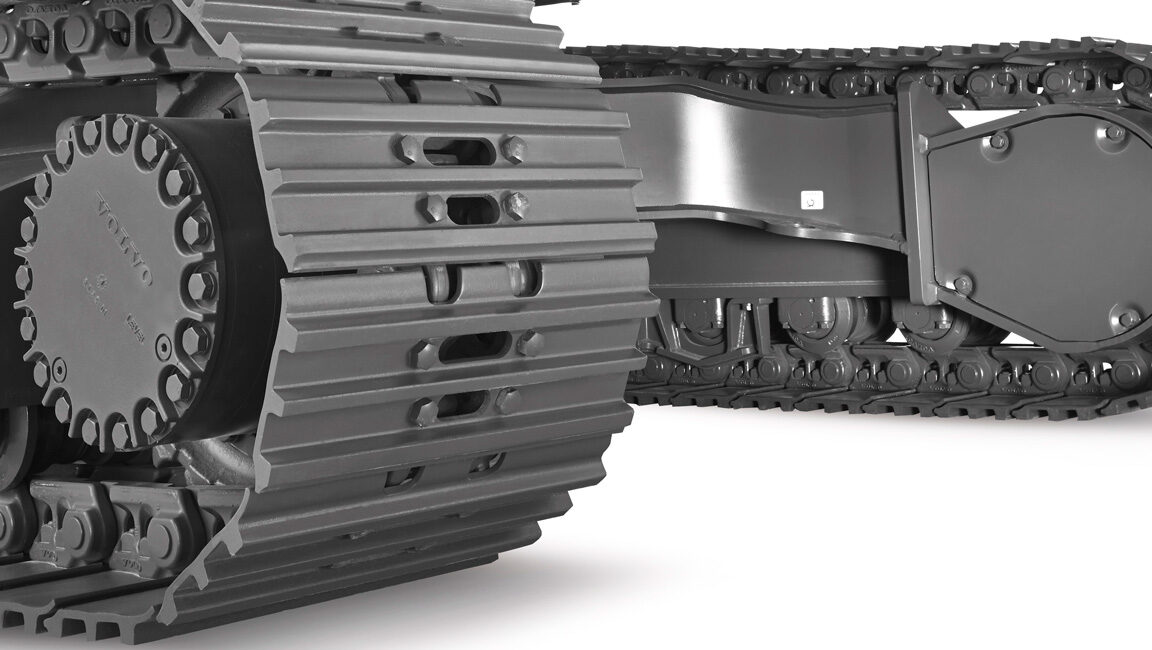
A machine’s undercarriage is especially important to keep an eye on. The undercarriage supports the total weight of the machine and is continuously subjected to rocks and other obstacles when in operation. Many of its parts are exposed to constant wear and stress. It’s also the most expensive part of an excavator. By keeping the undercarriage in good condition, you can count on improved safety and efficiency from the machine.
The technicians at Nuss are great resources to perform undercarriage inspections. But our recommendation is to conduct a visual inspection once a week or every 40 operating hours, which means your technicians and operators should also be doing these. With that in mind, here are a few tips for inspecting your equipment’s undercarriage.
One quick note: Visual undercarriage inspections should not replace regularly scheduled undercarriage management. Proper undercarriage management entails measuring undercarriages, tracking wear, replacing worn components, and swapping component positions to extend the total undercarriage life. You’ll need conversation charts for each brand of undercarriages to convert them to percent worn.
Cleaning the machine before an inspection
To do an inspection on the machine, it should be somewhat clean for the sake of accuracy. Although this may be time-consuming, cleaning the undercarriage regularly will keep it in a better condition, make it easier to see issues at an early stage, and lessen the wear on the components.
Track tension
Measure the track tension and document the results. Make adjustments to the track tension if necessary and document the adjustments as well. You can find the correct track tension in the operator manual.
Component checks
Undercarriage inspection checklist  When inspecting the machine, go through one side at a time. Keep in mind that the sprocket is at the rear of the machine and the idler is in the front, so the right and left sides are not mixed up in the report.
Remember to check:
- Track shoes
- Links
- Pins
- Bushings
- Top rollers
- Bottom rollers
- Idlers
- Sprockets
Refer to this checklist for more details on what to look for in each component. A couple of items to note:
- Check the components according to the description for that specific component. Take notes and fill in any useful comments.
- Carefully check the links for cracks, spalling, side wear, and wear on the pin boss. You can also count the links to see if one was removed during assembly in an effort to tighten the undercarriage. If someone has made it too tight, that will spell trouble in the near future.
Wear distribution
The last step is to compare the two sides of the undercarriage assembly to each other. Does one side show more wear than the other? Use the wear distribution graphic at the bottom of the checklist to indicate the overall wear for each side. Should one side have more wear than the other, show this by marking that side further from the center, but still relative to the wear on the better side.
Additional undercarriage resources
If you’re unsure exactly what you’re looking at or what might need to be done, your local Nuss dealer can help.
Buying machines with warranty coverage for undercarriages is another good way to ensure the components stay in good working order.
Besides inspecting the undercarriages on the equipment in your current fleets, it’s also important to carefully evaluate the undercarriage — and other components — of a used machine you’re considering buying.